
Configure Copilot Chat
Choose the Copilot Chat provider, authenticate a GitHub Copilot subscription, and manage model and advanced settings.
Open Chat settings
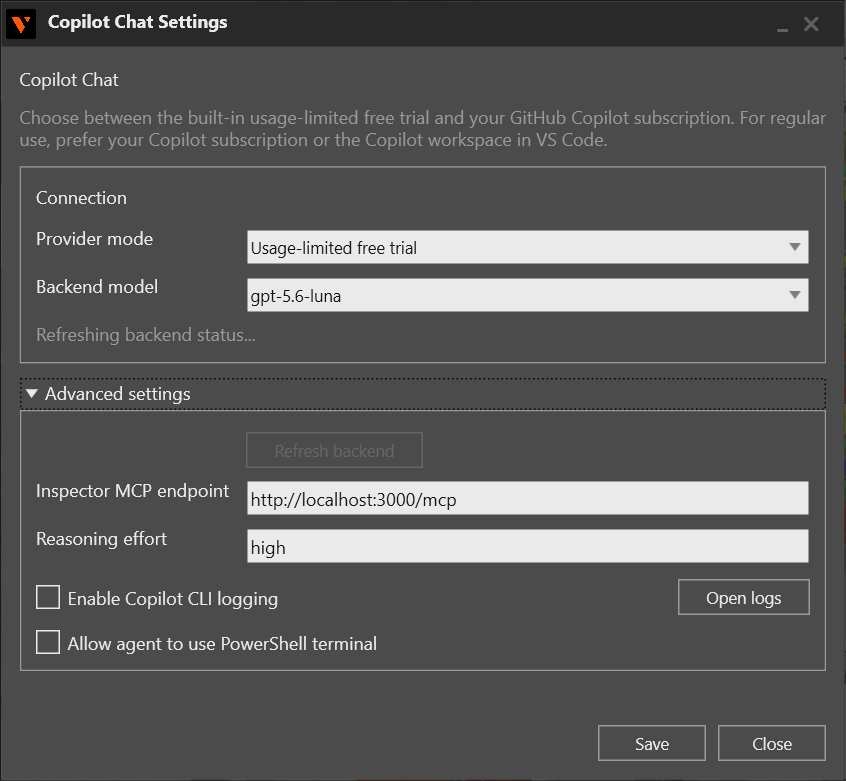
Use Settings in the Chat header or welcome screen to choose how Inspector connects to Copilot. Settings are saved only when you select Save.
Choose a provider
The Provider mode list has two supported choices:
- Usage-limited free trial is the default. It does not require GitHub Copilot sign-in and shows remaining trial credit when that information is available.
- GitHub Copilot Subscription uses the packaged Copilot CLI and your GitHub Copilot sign-in for regular use.
Select the provider that matches the account and usage you intend to use, then continue with the matching settings below.
Sign in to GitHub Copilot
- Select GitHub Copilot Subscription in Provider mode.
- Select Save. The provider setting must be saved before sign-in starts.
- Reopen Settings if needed, then select Start Copilot sign-in.
- Keep the terminal open, copy the one-time code it displays, and enter the code in the browser page after signing in.
- Return to Settings and wait for Inspector to verify the sign-in and refresh the available models.
The packaged Copilot CLI stores credentials for the current Windows user. Do not enter credentials into the Chat prompt. Use Sign-in help for the linked GitHub OAuth instructions.
When the account is authenticated, choose a model in the Model list and select Refresh when the account's model catalog changes. Select Sign out to remove the saved Copilot CLI sign-in.
Review advanced settings
Expand Advanced settings when you need to inspect or change supporting options:
- Inspector MCP endpoint is read-only and is derived from the current Inspector MCP server settings.
- Reasoning effort controls the configured reasoning setting passed to the Copilot session.
- Enable Copilot CLI logging enables runtime logs. Use Open logs to open the log folder when diagnosing a connection or session problem.
- Allow agent to use PowerShell terminal makes PowerShell tools available to the agent. Terminal commands still require approval before they run.
In free-trial mode, use Refresh backend when the connection or available model list needs to be checked again. The status text reports whether the connection succeeded or why metadata is unavailable.
Select Save after changing any setting. The status text reports whether the settings were saved or could not be saved.